HI Guys,
This session is for configuring chroot JAIL and locking the user to his home directory.
First step is to open the vsftpd configuration file.And uncomment below line .
#vim /etc/vsftpd/vsftpd.conf
##########################################################################
anonymouse_enable=no
local_enable=Yes
write_enable=yes
local_umask=022
dirmessage_enable=yes
xferlog_enable=yes
connect_from_port_20=yes
ascii_upload_enable=yes
ascii_download_enable=yes
chroot_local_user=YES
pam_service_name=vsftpd
userlist_enable=yes
tcp_wrapper=yes
##########################################################################
And now save the changes and restart the vsftpd service.
#/etc/init.d/vsftpd restart.
Now login to your ftp account and check .You should now will not be able to come out of your home directory.
Hope this session was interesting and should be help for the beginner in the Linux.
Regards
Ram kumar
Advertise

Sunday, February 27, 2011


Saturday, February 26, 2011
HOW TO CONFIGURE VSFTPD AND ENABLE FTP SERVER
HI GUYS.
This i am going to give an steps that need to be follow to configure VSFTPD BASED FTP SERVER WITHOUT CHROOT JAIL ENVIRONMENT.
Please install few vsftpd related packages in the Linux Box as mentioned below
#yum install vsftpd.
Now please configure vsftpd file as mentioned below .
#vim /etc/vsftpd/vsftpd.conf
now uncomment below line to make the ftp server operational.
##########################################################################
anonymouse_enable=no
local_enable=Yes
write_enable=yes
local_umask=022
dirmessage_enable=yes
xferlog_enable=yes
connect_from_port_20=yes
ascii_upload_enable=yes
ascii_download_enable=yes
pam_service_name=vsftpd
userlist_enable=yes
tcp_wrapper=yes
##########################################################################
Now after this restart vsftpd service to let the changes get reflected.
#/etc/init.d/vsftpd restart
Now access the ftp account from ftp tools or from browser.
And in case even after that you are not able to access your ftp home directory then please issue below command in the terminal to allow access to ftp home directory.
#setsebool -P ftp_home_dir 1
this should fix the issue and Hope this article give some good stuff for the beginner in Linux.
Regards
Ram kumar
This i am going to give an steps that need to be follow to configure VSFTPD BASED FTP SERVER WITHOUT CHROOT JAIL ENVIRONMENT.
Please install few vsftpd related packages in the Linux Box as mentioned below
#yum install vsftpd.
Now please configure vsftpd file as mentioned below .
#vim /etc/vsftpd/vsftpd.conf
now uncomment below line to make the ftp server operational.
##########################################################################
anonymouse_enable=no
local_enable=Yes
write_enable=yes
local_umask=022
dirmessage_enable=yes
xferlog_enable=yes
connect_from_port_20=yes
ascii_upload_enable=yes
ascii_download_enable=yes
pam_service_name=vsftpd
userlist_enable=yes
tcp_wrapper=yes
##########################################################################
Now after this restart vsftpd service to let the changes get reflected.
#/etc/init.d/vsftpd restart
Now access the ftp account from ftp tools or from browser.
And in case even after that you are not able to access your ftp home directory then please issue below command in the terminal to allow access to ftp home directory.
#setsebool -P ftp_home_dir 1
this should fix the issue and Hope this article give some good stuff for the beginner in Linux.
Regards
Ram kumar
Sunday, January 16, 2011
Monday, October 4, 2010
Xine Error the stream /tmp/ uses an unsupported codec:video codec:MPEG 1/2 (0x0) (null) start playback any
Hi Guys.
I was facing an issue while playing any video file in the xine .I used to get below message in a popup window and even if i am going to click any one of the option yes or no. It still exists and i was not able to play any media file in the xine.
So work around which i was able to get was mentioned below .
#yum install xine
#yum install xine-plugin
#yum install xine-lib
#yum install xine-lib-extras
#yum install xine xine-lib libdvdcss
#yum install xine-lib-extras-freeworld
I was facing an issue while playing any video file in the xine .I used to get below message in a popup window and even if i am going to click any one of the option yes or no. It still exists and i was not able to play any media file in the xine.
So work around which i was able to get was mentioned below .
#yum install xine
#yum install xine-plugin
#yum install xine-lib
#yum install xine-lib-extras
#yum install xine xine-lib libdvdcss
#yum install xine-lib-extras-freeworld
Tuesday, May 25, 2010
Apache httpd-2.2.15 Compilation error make[3]: Leaving directory `/usr/local/src/httpd-2.2.15/os/unix' make[2]: *** [all-recursive] Error 1
HI All
I was getting Error while compiling the Apache in the Fedora 13.And Error is as below
Error=============================================================================
Error Log
unixd.c:54: error: expected declaration specifiers before ‘unixd_config_rec’
unixd.c:64: error: expected ‘=’, ‘,’, ‘;’, ‘asm’ or ‘__attribute__’ before ‘{’ token
unixd.c:116: error: expected ‘=’, ‘,’, ‘;’, ‘asm’ or ‘__attribute__’ before ‘{’ token
unixd.c:188: error: expected ‘=’, ‘,’, ‘;’, ‘asm’ or ‘__attribute__’ before ‘{’ token
unixd.c:215: error: expected ‘=’, ‘,’, ‘;’, ‘asm’ or ‘__attribute__’ before ‘{’ token
unixd.c:227: error: expected ‘=’, ‘,’, ‘;’, ‘asm’ or ‘__attribute__’ before ‘{’ token
unixd.c:241: error: expected ‘=’, ‘,’, ‘;’, ‘asm’ or ‘__attribute__’ before ‘{’ token
unixd.c:265: error: expected ‘=’, ‘,’, ‘;’, ‘asm’ or ‘__attribute__’ before ‘{’ token
unixd.c:323: error: storage class specified for parameter ‘_hooks’
unixd.c:327: error: expected declaration specifiers before ‘AP_IMPLEMENT_HOOK_RUN_FIRST’
unixd.c:402: error: expected declaration specifiers or ‘...’ before ‘apr_proc_t’
unixd.c:405: error: expected declaration specifiers or ‘...’ before ‘apr_procattr_t’
unixd.c:406: error: expected ‘=’, ‘,’, ‘;’, ‘asm’ or ‘__attribute__’ before ‘{’ token
unixd.c:418: error: expected ‘=’, ‘,’, ‘;’, ‘asm’ or ‘__attribute__’ before ‘proc_mutex_mech’
unixd.c:431: error: expected ‘)’ before ‘*’ token
unixd.c:484: error: expected ‘)’ before ‘*’ token
unixd.c:496: error: expected declaration specifiers or ‘...’ before ‘ap_listen_rec’
unixd.c:498: error: expected ‘=’, ‘,’, ‘;’, ‘asm’ or ‘__attribute__’ before ‘{’ token
/usr/local/src/apache/include/http_config.h:975: error: old-style parameter declarations in prototyped function definition
/usr/local/src/apache/include/http_config.h:975: error: parameter name omitted
unixd.c:642: error: expected ‘{’ at end of input
make[3]: *** [unixd.lo] Error 1
make[3]: Leaving directory `/usr/local/src/httpd-2.2.15/os/unix'
make[2]: *** [all-recursive] Error 1
make[2]: Leaving directory `/usr/local/src/httpd-2.2.15/os/unix'
make[1]: *** [all-recursive] Error 1
make[1]: Leaving directory `/usr/local/src/httpd-2.2.15/os'
make: *** [all-recursive] Error 1
Error=============================================================================
And the solution for the above issue is as mentioned Below
I have selected httpd-2.0.63 from the apache mirror and then i have compiled it and i was able to fix the issue.
Hope it should help some one who is facing similar issue.
I was getting Error while compiling the Apache in the Fedora 13.And Error is as below
Error=============================================================================
Error Log
unixd.c:54: error: expected declaration specifiers before ‘unixd_config_rec’
unixd.c:64: error: expected ‘=’, ‘,’, ‘;’, ‘asm’ or ‘__attribute__’ before ‘{’ token
unixd.c:116: error: expected ‘=’, ‘,’, ‘;’, ‘asm’ or ‘__attribute__’ before ‘{’ token
unixd.c:188: error: expected ‘=’, ‘,’, ‘;’, ‘asm’ or ‘__attribute__’ before ‘{’ token
unixd.c:215: error: expected ‘=’, ‘,’, ‘;’, ‘asm’ or ‘__attribute__’ before ‘{’ token
unixd.c:227: error: expected ‘=’, ‘,’, ‘;’, ‘asm’ or ‘__attribute__’ before ‘{’ token
unixd.c:241: error: expected ‘=’, ‘,’, ‘;’, ‘asm’ or ‘__attribute__’ before ‘{’ token
unixd.c:265: error: expected ‘=’, ‘,’, ‘;’, ‘asm’ or ‘__attribute__’ before ‘{’ token
unixd.c:323: error: storage class specified for parameter ‘_hooks’
unixd.c:327: error: expected declaration specifiers before ‘AP_IMPLEMENT_HOOK_RUN_FIRST’
unixd.c:402: error: expected declaration specifiers or ‘...’ before ‘apr_proc_t’
unixd.c:405: error: expected declaration specifiers or ‘...’ before ‘apr_procattr_t’
unixd.c:406: error: expected ‘=’, ‘,’, ‘;’, ‘asm’ or ‘__attribute__’ before ‘{’ token
unixd.c:418: error: expected ‘=’, ‘,’, ‘;’, ‘asm’ or ‘__attribute__’ before ‘proc_mutex_mech’
unixd.c:431: error: expected ‘)’ before ‘*’ token
unixd.c:484: error: expected ‘)’ before ‘*’ token
unixd.c:496: error: expected declaration specifiers or ‘...’ before ‘ap_listen_rec’
unixd.c:498: error: expected ‘=’, ‘,’, ‘;’, ‘asm’ or ‘__attribute__’ before ‘{’ token
/usr/local/src/apache/include/http_config.h:975: error: old-style parameter declarations in prototyped function definition
/usr/local/src/apache/include/http_config.h:975: error: parameter name omitted
unixd.c:642: error: expected ‘{’ at end of input
make[3]: *** [unixd.lo] Error 1
make[3]: Leaving directory `/usr/local/src/httpd-2.2.15/os/unix'
make[2]: *** [all-recursive] Error 1
make[2]: Leaving directory `/usr/local/src/httpd-2.2.15/os/unix'
make[1]: *** [all-recursive] Error 1
make[1]: Leaving directory `/usr/local/src/httpd-2.2.15/os'
make: *** [all-recursive] Error 1
Error=============================================================================
And the solution for the above issue is as mentioned Below
I have selected httpd-2.0.63 from the apache mirror and then i have compiled it and i was able to fix the issue.
Hope it should help some one who is facing similar issue.
Sunday, May 9, 2010
UBUNTU-10.04_64 Bit OS Flash Player Error
Hi All
I have installed Ubuntu 10.04 64bit Version in the my Laptop.But i was not able to play flash in my system , so work around for this issue is as mentioned below.
Solution
$sudo aptitude install ubuntu-restricted-extras
Then enter the password and then it will install all the software related to flash in your system.
Then you are done with your work.
Then Enjoy Flash and help spread Linux.
Regards
Ram kumar
I have installed Ubuntu 10.04 64bit Version in the my Laptop.But i was not able to play flash in my system , so work around for this issue is as mentioned below.
Solution
$sudo aptitude install ubuntu-restricted-extras
Then enter the password and then it will install all the software related to flash in your system.
Then you are done with your work.
Then Enjoy Flash and help spread Linux.
Regards
Ram kumar
Saturday, May 8, 2010
Wireless Config in Fedora 12_x86_64
Hi All
I am going to give you the steps that are needed to configure wireless Lan in the Fedora 12 64 Bit OS.
Tested on Dell Inspiron 1525
Steps are as follows
#yum install kmod-ndiswrapper
#mkdir /ndiswrapper_drivers
#cd /ndiswrapper_drivers
Now Get the drivers .inf and .sys files which you will get from the installation of wireless lan from the windows machine or click the wireless lan drivers that has been downloaded from the dell site. and Click Extract and find the .sys and inf files
Now get this file and put it in the Above directory
#cp xyydriver.inf /ndiswrapper_drivers/
#cp xyydriver.sys
Now issue below command
#ndiswrapper -i xyydriver.sys
Now you are done with drivers installation part now go to the NetworkManger and Configure the details Like SSID and DHCP ..
Once done it will show you the wireless Access Point .
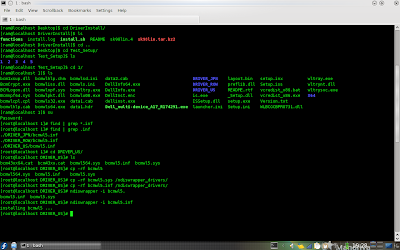
Now for you reference i am attaching screen shot also
Hope this guide will help some one who need help in activating wireless lan from Linux Machine
And final thing help spread linux .
Regards
Ram kumar
I am going to give you the steps that are needed to configure wireless Lan in the Fedora 12 64 Bit OS.
Tested on Dell Inspiron 1525
Steps are as follows
#yum install kmod-ndiswrapper
#mkdir /ndiswrapper_drivers
#cd /ndiswrapper_drivers
Now Get the drivers .inf and .sys files which you will get from the installation of wireless lan from the windows machine or click the wireless lan drivers that has been downloaded from the dell site. and Click Extract and find the .sys and inf files
Now get this file and put it in the Above directory
#cp xyydriver.inf /ndiswrapper_drivers/
#cp xyydriver.sys
Now issue below command
#ndiswrapper -i xyydriver.sys
Now you are done with drivers installation part now go to the NetworkManger and Configure the details Like SSID and DHCP ..
Once done it will show you the wireless Access Point .
Now for you reference i am attaching screen shot also
Hope this guide will help some one who need help in activating wireless lan from Linux Machine
And final thing help spread linux .
Regards
Ram kumar

Subscribe to:
Posts (Atom)